Were you part of the faithful that went to church on Easter? Or are you the faithful that only go to church for special occasions which puts Easter high on your to-do list every year: go to church on Easter(note to self). Better yet, do you attend regularly? I won't say what regularly is because that in it self can cause a controversial debate.
But anyway, that is not the point. I want to know how many of you ate the 'standard' or traditional meal? You know....Ham? Or what? Usually if you aren't eating Ham you are going out to eat, right? I'm sure of it. Nobody cooks anymore, or at least not what they want when they want. They are peer pressured into the same old meals every year unless they go out to eat and escape the scrutiny.
Some who are close to me, or at least think they have reasonable evidence to say they 'know' me could tell you that I loathe (OK, maybe that's too strong a word) doing the 'usual' thing for meals on Holidays.
My friend Gary and his family went out for pizza! My wife says that her family does a big seafood dinner every year at Christmas. Now that sounds good! One year we (my family-mom & dad, sister & her family and such) grilled Lamb Shanks on an outdoor grill (we can do that in the South) with various other non-traditional side dishes for Thanksgiving.
This past (yesterday) Easter we had an Angel Hair Pasta with ingredients like: black label bacon (Pancetta was not available), shrimp, diced tomato, fresh garlic, butter, extra virgin olive oil, white wine, mushrooms, spinach, Parmesan cheese and of course select herbs and spices.
My wife said it was the best ever (Angel Hair pasta that she had). I must agree even if it borders on arrogance. Easter dinner...what was yours?
Tell me, I'm interested - leave a comment.

Celebrity Chefs (make them go away!)
[I must admit that I fell for this April Fools joke. The article in Food Art was a joke, and I should be chuckled at just for not really paying attention to the names used in the article which clearly have food connotation/reference in them...but I must still add, that my attitude about it is the same, and I believe that these kind of people are still out there. So I would almost label this a 'prophetic' telling of whats to come next in this industry]
In the March 2007 Food Art issue titled, Idol Hour was enough information, assumptions, and predictions to make me sick to my stomach.
As you all know (if you don't you haven't seen an ounce of news in the last 10 years) these 'celebrity chefs' and food 'anything' have been all the (rant &) rave clawing and climbing its way to the top of the 'Media' world. And so has progressed the latest atrocity & horror of well-known(?) Culinary 'schools' contemplating adding a certificate course for 'Celebrity Chefdom' career style.
I use the term 'schools' lightly because one has to question what kind of establishment caters (no pun intended) to the selfish, egotistic, celebrity chef wannabe, ........ notion that they can skip all the years of hard work, dedication, and passion to be called a chef?!?!?! Even if it is for a few dollars to appear on TV as the hottest thing going!
We already have drama and acting schools, leave the acting up to those who do it well!!! You (the culinary schools at large) should not be adding a 'culinary' glorified acting 'celebrity chef' program to your school!!! I would hope doing so would take your 'credentials' credibility down a few notches!
I have worked 15 years (approx.) in the Food/Restaurant/Catering service-business, 5 years in the Beverage Industry, and 5 of those culinary years were spent traveling in Central America, Caribbean, Europe, and Africa with a volunteer mission organization (Mercy Ships) working as the Executive Chef on two of their ships.
I have this tiny blog that mostly just friends and family read, a degree in Computer Information Systems (not culinary) and have received most of my culinary training by apprenticeship, determination, self-education, traveling, experiencing different cultures, and work experience...just to name a few. I have ate 'meat pies' in Scotland and Termites in Honduras. And I am subjected to 'knuckleheads' that want to degrade and lessen the culinary society as a whole? And 'schools' are going to cater to this? Disgraceful.
Please, oh please CIA (Culinary Institute of America) tell me you are not going to participate in this foolish endeavor. Even if it succeeds it will lesson the quality, degrade, and cheapen (how else can I say it?) those of us who cook and live to the passion of all things culinary.
In this article it talks about a few 'celebrity chefs' that are well-known, and/or were the 'first' but I don't know (and have never heard of them before) who they are...I get a much better response out of googling my own name (nickname, blog spot) than I do any of theirs. The only thing that comes up is this article with their name in it! And I have already admitted to being known only within my own family and friends!
Which brings me to food network (I don't even have cable). Since I move around so much with my work my dad tapes the shows I want to watch from food network (thank you Dad!)...and I can tell you they are getting less and less to pick from. Oh, there are still new shows developing all the time but they are starting to come 'cookie cutter' style with any flamboyant charismatic character that remotely is connected with (a piece of) food. And there are some that were able/willing to escape, be bold, or at least realize they deserved better have moved on and brought their audience with them. And rightly so.
But there is still a special place in my heart for those who have stayed and persevered, and those are the ones that my dad still video tapes for me and sends them along so I can amuse myself and maybe learn something. Its kind of like the sitcom, learning, and comedy TV for us cooks/foodies.
I love the title Chef, and I believe I have earned that accomplishment but I almost cringe when someone addresses me with that title because 'our' whole society has elevated it to a dream of not becoming an actual Chef, but a 'celebrity chef'.
In LaRousse Gastronomique here is quoted the first sentence for the definition of Chef: CHEF A person who prepares food as an occupation in a restaurant, private house, or hotel.
Now this book is touted by many a chef, cook, foodies...alike to be one of THE Bibles of epicurean proportions...but society has manipulated the Chef title to be a title of arrogance and pedigree.
What school did you got to? What? No culinary degree...uh, no...the closest culinary school (I think) to me was over 4 hours away (and of NO particular note, actually I think it is now defunct) when I started my (legal) career of cooking at age 16 at the A&W Restaurant (yes, Root beer! We still made our own syrup then, It was not bought in a box). Besides, cooking an egg on an engine in basic auto mechanics class was the closest you were going to get to culinary class at high school/tech school choices.
But that's OK, just call me Tyrone, tyronebcookin, or bcookin for short. I don't need a title, I got the passion, creativity, and determination to pursue my goals. Which are probably surprisingly different than you may imagine. (http://tyroneandstephanie.com/ read introduction page).
Ah yes, back to the article. Well much can be said but with a quote like this:
"If the Institute had had this program when I went to school there," Speed said, raising the glass divider in the limousine bound for a television studio for his appearance on the Charlie Rose Show, "I could have shaved five years off this process. Five years of cooking—what a waste."
A thirty year old chef that says five years of cooking was a waste; implying that if culinary school had a program to boost him to celebrity status he wouldn't have needed to cook all that time.
I need to check my blood pressure, be back in a second...
What more should I say to convinve you I have a valid point?
Special Thanks to:
Bob Del Grosso
Michael Ruhlman
Pop-n-Fresh Donuts?
To get started I microwaved some white and milk chocolate chips (bought from any grocery store) until they were smooth. See the two bowls in the picture? We will use this to dip the donuts in later. I used an electric stove and a non-stick pan (I am sure it can be any pan) on medium heat for about 20 - 30 minutes before I got started. Tada! Yep, that's right! Here is the donut dough that I am using (CANNED BISCUITS!)...it usually comes 4 cans to a pack at around $1.50 (for the 4 pack package, so that means a possible 40 donuts for $1.50!).
 Now we just rub our fingers together in a circular pattern until we have a hole in the middle. Do about five of these at a time then just keep them held on your fingers. Do more than that if you get the hang of it and can fry them with enough time to flip them without burning any.
 Look at the following pictures below to see a 'tester' being fried up first. Because if you at least do one you will know if your oil temp is going to work for you. (and this way we don't have to get all technical taking temperatures and such). I could count between seven and ten and flip them and that usually worked out good for me.


 Now that you know how to adjust to the way your oil is cooking the donuts, we can do 5 at a time! (or more if you can!)


 As you have seen in my pictures either a slotted 'fish' spatula or a pair of tongs work out nicely for these donuts. Then we can drain them on some paper towels. Note: If you just want to shake some cinnamon sugar on them fresh from the oil that topping works out nicely too...and a little less calorie intake! hahaha! But hey, your making DONUTS so who is counting anyway?!?!
 Tada! Yep, that's right! Here is the donut dough that I am using (CANNED BISCUITS!)...it usually comes 4 cans to a pack at around $1.50 (for the 4 pack package, so that means a possible 40 donuts for $1.50!).
 Now we just rub our fingers together in a circular pattern until we have a hole in the middle. Do about five of these at a time then just keep them held on your fingers. Do more than that if you get the hang of it and can fry them with enough time to flip them without burning any.
 Look at the following pictures below to see a 'tester' being fried up first. Because if you at least do one you will know if your oil temp is going to work for you. (and this way we don't have to get all technical taking temperatures and such). I could count between seven and ten and flip them and that usually worked out good for me.
 Now that you know how to adjust to the way your oil is cooking the donuts, we can do 5 at a time! (or more if you can!)

 As you have seen in my pictures either a slotted 'fish' spatula or a pair of tongs work out nicely for these donuts. Then we can drain them on some paper towels. Note: If you just want to shake some cinnamon sugar on them fresh from the oil that topping works out nicely too...and a little less calorie intake! hahaha! But hey, your making DONUTS so who is counting anyway?!?!
Now lets dip the donuts and eat them fresh, or wait to the following day and the chocolate will have set harder.


 Eat them fresh is what I suggest, but a few seconds in the microwave will soften the donut and the chocolate again. Mmmm, delicious! So how much did those homemade 40 donuts cost you?

 Eat them fresh is what I suggest, but a few seconds in the microwave will soften the donut and the chocolate again. Mmmm, delicious! So how much did those homemade 40 donuts cost you?
Orange-Balsamic Asparagus ~ U CAN DO IT!
Relax. Breath deep. Its not...that hard. This will make 1 to 2 pounds of Asparagus. 2 pounds of the 'pencil' like Asparagus is what we suggest. If its much thicker than it will be longer to blanch them.
First get two pots and a bowl. In the one pot fill it half with water and then add salt to it till it tastes salty (salty like ocean water). Fill the other pot with one cup sugar (just plain white sugar) and the same amount of Balsamic Vinegar. Fill the bowl (or container) with ice then add cold water to it.
Heat the water to a boil. Heat the sugar balsamic mixture till the sugar can no longer be seen or felt as a texture, basically make sure its all melted in.
 Please trim all your Asparagus accordingly, nobody likes chewing on a raw, tree like substance.
 Throw all the trimmed Asparagus into the boiling water. If you are using the 'pencil' size (or a little bit bigger) leave it in no longer than 30 to 45 seconds. Asparagus should look nice and green, not dull. Immediately throw it in the ice water.
 Meanwhile (or even ahead of time) zest one orange.
 After zesting one orange, lets look at these two brands of orange oil. We pick these up at Whole Foods, Central Market, and/or check your local grocery store...they have become a lot more accommodating lately. We will be adding the zest of one orange and about a half teaspoon of pure orange oil to our balsamic (syrup). If you can not find the oil, then juice the orange you zested and add it to the syrup BUT, the orange flavor may not be as great!
 Notice we are simultaneously cooling down the balsamic (syrup) mixture on a bowl of ice while whisking the liquid. This should be the consistency of cheap pancake syrup. (or make this ahead of time and let it cool in the fridge.)
 Drain the Asparagus thoroughly then pour the (now cool or room temperature) orange-balsamic syrup over the asparagus. ( we have actually only used a few Asparagus that we needed for a client tasting). Your 1 or 2 pounds of Asparagus will be a lot more than this. You can also use a plastic bag and/or Ziploc container for letting this marinate over night. But steel is fine because its non-reactive
First get two pots and a bowl. In the one pot fill it half with water and then add salt to it till it tastes salty (salty like ocean water). Fill the other pot with one cup sugar (just plain white sugar) and the same amount of Balsamic Vinegar. Fill the bowl (or container) with ice then add cold water to it.
Heat the water to a boil. Heat the sugar balsamic mixture till the sugar can no longer be seen or felt as a texture, basically make sure its all melted in.
 Please trim all your Asparagus accordingly, nobody likes chewing on a raw, tree like substance.
 Throw all the trimmed Asparagus into the boiling water. If you are using the 'pencil' size (or a little bit bigger) leave it in no longer than 30 to 45 seconds. Asparagus should look nice and green, not dull. Immediately throw it in the ice water.Meanwhile (or even ahead of time) zest one orange.
 After zesting one orange, lets look at these two brands of orange oil. We pick these up at Whole Foods, Central Market, and/or check your local grocery store...they have become a lot more accommodating lately. We will be adding the zest of one orange and about a half teaspoon of pure orange oil to our balsamic (syrup). If you can not find the oil, then juice the orange you zested and add it to the syrup BUT, the orange flavor may not be as great!
 Notice we are simultaneously cooling down the balsamic (syrup) mixture on a bowl of ice while whisking the liquid. This should be the consistency of cheap pancake syrup. (or make this ahead of time and let it cool in the fridge.)Drain the Asparagus thoroughly then pour the (now cool or room temperature) orange-balsamic syrup over the asparagus. ( we have actually only used a few Asparagus that we needed for a client tasting). Your 1 or 2 pounds of Asparagus will be a lot more than this. You can also use a plastic bag and/or Ziploc container for letting this marinate over night. But steel is fine because its non-reactive
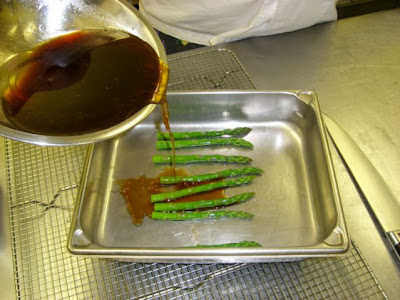

Let this sit over night in your refrigerator, drain thoroughly and serve cool to room temperature.
Everything can be done in stages. It does not have to be at the same time. Make the syrup and then just keep it in the fridge. Blanch the Asparagus ahead or after, just don't keep the Asparagus for over a day before starting to marinate it.
Serve that at your next party! Use an orange or blood orange half cut fancy in the middle of a platter with the Asparagus spears fanned out from it, with a little zest sprinkled on top. Or just stack it up on your favorite (any shape) plate or platter.
We use this in meals as a vegetable dish, salad, and/or mostly an appetizer.
Chocolate Tempering - its more than melting!
*Thanks to Robert @ the Chocolate Guild & Chocolatier Noël
Tempering
Tempering is a crucial step in creating any types of truffles, bon bons, pralines, or any type of chocolates. Tempering is the process of developing "Beta" crystals in chocolate. Below you will find the temperatures to properly temper chocolate. Below that, the process will be described and the supplies needed will be listed.
 Items Needed:
Tempering
Tempering is a crucial step in creating any types of truffles, bon bons, pralines, or any type of chocolates. Tempering is the process of developing "Beta" crystals in chocolate. Below you will find the temperatures to properly temper chocolate. Below that, the process will be described and the supplies needed will be listed.
Items Needed:1) Medium to Large Pot
2) Stainless steal bowl
3) Spatula
4) Precise Thermometer
5) Chocolate already in temper (any chocolate you buy will already be in temper)
Process:
1) Fill Pot 1/4-1/2 full with water
2) Heat water to a boil, Then turn off heat
3) Have chocolate chopped up in stainless steal bowl and then place on pot(The idea is the melt the chocolate through the subtle heat of the water). We do not want the bowl touching the water in pot. If it does, remove some water or use a smaller pot or bigger bowl. The bowl over the pot of hot water is called a "Double Boiler"(See Terms)
4) Let the Chocolate melt as it is in the bowl and stir to let the chocolate heat evenly.
5) Place thermometer in the Chocolate and heat chocolate to "Melt to" Temperature in the above chart.
6) When it has reached that temperature take off heat and wipe the bottom of the bowl as to not get ANY moisture near the chocolate. If moisture gets in the chocolate it will seize and be ruined.
7) Let chocolate just sit and cool to "seed at" Temperature, stirring occasionally to get a uniform temperature. Then add Tempered chunks of chocolate to the melted chocolate. About 1/4 or 25% tempered chocolate chunks as compared to the 100% Melted chocolate. 100% Melted chocolate to 25% Tempered chocolate chunks.(example: 4 ounces melted chocolate to 1 ounce tempered chocolate chunk)
8) Stir continuously with the "seed" in the melted chocolate until you reach, "Take out seed" Temperature. At this point remove the seed.
The Chocolate is now Tempered!
The Chocolate is now Tempered!
9) Adjust "Working Temp." by letting cool slightly just by letting sit and stirring here and there. The working temp is only there to adjust the viscosity. The colder the chocolate the thicker it will be. The hotter it is the more fluid it will be.
-----------------------------------------------------------------------------
Never let tempered chocolate go back up past 90 Degrees F when reheating.
-When the tempered chocolate is getting to cold you can reheat over the water(double boiler), just don't let it get over 90 degree's and you will be fine.
-When the tempered chocolate is getting to cold you can reheat over the water(double boiler), just don't let it get over 90 degree's and you will be fine.
-----------------------------------------------------------------------------
*Thanks to Robert @ the Chocolate Guild & Chocolatier Noël
Risotto - U always wanted to know how to do it!
*Thanks to Chef Ira Krizo, Christian Chefs Fellowship (Director), Pinehurst Inn & White Pine Restaurant.
Risotto is a rice dish prepared al dente (not crunchy, but firm grains) with a unique smooth and creamy texture and consistency of firm rice grains bound in its velvety sauce, making it far unlike any other rice dish in the world. The major components of this unique Italian dish are a particular kind of short grain rice, broth, and other flavoring ingredients, but to make extraordinary risotto you must know how each ingredient works together to prepare it perfectly and how to use the "extra" flavoring ingredients. We will start out with what the major components of risotto are, including choosing the ingredients that will be best suited to fit your personal needs, and end with a few of the different techniques that can be used to prepare this dish, and of course, some recipes will follow.
The Ingredients:
Rice: The most important ingredient in this dish is obviously rice, but with risotto, only a few specific types of rice can be used. Only certain strains of short grain rice can be used because it has the highest content of the glutinous starch, which is what produces the creamy texture associated with traditional risotto. The most popular strain used is the Italian-grown Arborio rice, which is a strain that's widely available in most areas. Other strains of short grain rice that can be used are Vialone, Carnaroli, and Baldo rice, which can be used interchangeably for Arborio in risotto recipes. All these rices have subtle differences in grain size, cooking time, and texture, so if you desire, you can test all of these to find your personal favorite. Although it's best to stick with the Italian-grown rice, if you're unable to find any of the above varieties you can substitute with American short-grain rice, California-grown Arborio rice, or "pearl" rice.
Broth: Because it adds more to risotto's taste than anything else, it's very important that you use a very well-flavored and seasoned (but NOT too salty or overpowering) broth. Depending on what extra ingredients (see below) you're going to add to your risotto, you can use broths made with vegetables, chicken, meat, fish, or shellfish. It's obviously best to make your own fresh broth, but it's understood that many people won't do that, so instead of using water you can still use well-diluted instant bouillon cubes, or a low-sodium canned broth in its place.
Oil: A small amount of oil is always used in the first part of making risotto, and the best oil used for this, because of its unique and excellent flavors, is an extra-virgin olive oil. Other oils, such as canola oil, can be used in its place, but will not add any flavor to your risotto like olive oil would.
Butter: The oil is used for the first part of making risotto, but to enhance the flavor and creaminess of risotto, a bit of unsalted butter is usually added right before the serving of it. For those who are trying to make a little lower-fat version of risotto, this (although not recommended) can be removed in part or whole from the recipe.
Cheese: The most popular cheese used in risotto is the Italian parmigiano-reggiano (otherwise known as "parmesan"). This is almost always stirred in or sprinkled on top of the risotto right before it's served to the customer, again adding to that richness and creaminess of the dish. Other cheeses can be mixed or substituted with this also, like mozzarella, goat cheese, or any of your other favorite cheeses. As in all cooking, just keep trying new things with it every time you make it and eventually you'll find your favorite.
Other: Here is where your imagination comes in. All the previous ingredients are included in almost every risotto you'll find, but to make it all the more special you can add your own touch to the dish. The list goes on and on, but I'll list a few to get you thinking: mushrooms, saffron, chopped fresh herbs, spinach, grilled vegetables, and sun-dried tomatoes. Meat, fish, and poultry are excellent additions to risotto as are lobster, quail, shrimp, sausage, etc. You can even make sweet risotto with fruit, which would be good for a breakfast side dish or an accompaniment to a dessert. Almost all these ingredients can be precooked, and can be added on top of or stirred into the risotto right before serving. One of the few exceptions to that would be certain kinds of seafood, which can be added at different points of the cooking process to be finished at the same time as the risotto if you're confident you can do so without overcooking the seafood.
Techniques:
Now that you know all about what ingredients can go into your risotto, I'll explain a few different methods of preparing the dish itself, which is a fairly easy one to make and perfect. The first technique covered will be in how to prepare the classic version of risotto. From there, we'll go into a few variations of that, including the restaurant technique.
Classic Risotto: This method, if prepared properly, will produce the best, creamiest risotto out of all the techniques. The recipe itself for this method is included below, but basically it is simply sauteing the onion, adding the rice and briefly sauteing it, adding the wine, then the broth 1/2 cup (118 ml) at a time, and letting the rice absorb all the liquid after each addition. Then at the very end, adding the remaining 1/4 cup (59 ml) broth, the butter, cheese, salt and pepper, and your added ingredients, stirring and serving immediately. To tell when the risotto is finished, you must taste it, as cooking time alone may not necessarily tell you. Make sure the rice is still al dente, and at the same time has a nice overall creamy texture. And as with all methods, whatever you do, don't overcook it or you'll lose the rice and have just one batch of (a very flavorful) rice puree. The risotto may be done with less liquid than the recipe calls for, or it may require more liquid as well to come to the perfect risotto consistency. Okay, so now you may be wondering...why use any other method if this is the best?...but since this method requires that you stir it almost constantly with so many additions of liquid, you might prefer one of the other methods that takes less time and effort.
One Cup Method: This method requires that, instead of adding 1/2 cup (118 ml) of broth at a time, you add a full 1 cup (236 ml) of broth at a time. This method is a lot easier than the one above because you only make half the number of additions of liquid as the classic method, and you only have to stir it about half as much, too. The total amount of broth used in this recipe may be 1/2 cup (118 ml) to 1 cup (236 ml) less than the classic method also.
Restaurant Risotto: For larger restaurants, this technique might be the only method you can use due to time constraints. To make this, you don't completely finish cooking the risotto, and when the rice is still a bit crunchy, but close to being done, you spread the risotto on a sheet pan and put it in the refrigerator to cool it quickly, stopping the rice from softening. Now you'll have risotto that can last over the next 2-3 days that can be pulled out in whatever portions are needed and after about 5 more minutes of cooking will be finished. And just like the other methods, only at the end do you add the butter, cheese, seasonings, and other flavoring ingredients. We currently have risotto on the menu in the French restaurant I work in but we do not use this method. As mentioned above, the classic version is the best, so that's what method we use every day to best serve our customers.
Pressure Cooker and Microwave Risotto: These two methods do exist, but since most professional kitchens won't be using these, I'm not going into detail here on how to make them. If you'd still like their descriptions, please ask for them in CCF's message boards (link below).
Risotto Cakes: Another form of the finished product you can make, instead of creamy risotto, is risotto cakes. To make these, make risotto in any of the above fashions (with saffron if you'd like), cooking it a little bit drier than usual, and when it's finished cooking, refrigerate it. After refrigeration, the risotto will be very firm, at which point you can take some and form it into risotto cakes with your hands. Then, using a very small amount of a half-butter, half-oil mixture, pan-fry the cakes. Once finished, you generally want to serve them with a sauce of your choice.
Ira Krizo
CCF Director (Christian Chefs Fellowship)
Give it some color! (Yeah I know, I need a better camera!)
 Well folks, I know that previously I have talked about one of our (Stephanie and I) favorite meals which is a Black Bean Burger and Sweet Potato Home Fries...of which I left a recipe link in an earlier blog, very easy!
This time I want to revisit this meal in a different way. I peeled and cubed sweet & purple (yes purple) potatoes, blanched them, and then sauteed/pan fried them (not quite enough oil/butter to really call it pan frying but it sounds weird calling it sauteing?) with a little butter and olive oil...and when I say little, I mean hardly any at all. Not like Emeril or Paula Deen's use of butter or olive oil! Used some fresh ground salt & pepper, that's it! Browned them like a hash, the combination was delicious as well as healthy and visually appealing. Colorful!
Fresh vibrant colored avocado on top of that black bean burger (panini style) with mozzarella...the only way I could make it any better is use one of my favorite 'hot sauces' that is usually found in mom & pop Mexican restaurants: Chalula! ...as you will see in the picture. Yes, that is a glass of Merlot (Dellicato). But my favorite is an Australian, Black Swan.
Enjoy the visual. It really does and is an integral part of 'selling' the mind on making it taste even more appealing before the tongue even touches it. That combined with smell...SOLD!
ps. just to rub it in a little bit, the bread was one of our homemade facoccias.
Roasted Red Onion Cup
Just a quick lesson on making roasted onion cups...

 Now finish with the blanched tips pushed down into the top for a 'cute' pot o' plants:
Sorry the pictures aren't the greatest, but 'folks' is busy cookin' U know?!
Cut tops and bottoms off of red onion cups (why red? because they look better...but you can use white or yellow). How do you know you cut enough off? Is there 1 1/2 to 2 inch across flat surface area on each end of the onion? Then you got it right!
Do not worry about peeling off any skins, oiling the pan (maybe parchment/foil paper if you don't want to clean much) throw them on a sheet pan and cook them in the oven for about 1 to 1 1/4 hour on 350*F. Take them out let them cool down. See picture:
After the onions cool down, its time to pop out the centers (and you can use these tasty sweet flavored onions for another dish later!). Contrary to popular belief its easier to use you fingers on the (now cool to warm) onion popping out the center from pushing into the flat cut ON TOP OF THE ONION pushin it out the bottom. Look at the picture...the structure of the onion on top will hold more 'filling' in it when you pop out the middle from the bottom, them flip it over in the tray/pan on the top....confused? The bottom will have a bigger hole, so we use that as the top on the second part of this lesson. Look at this next picture good and you should see what I mean:
Now we have a good 'pot' to plant some food in...what kind of food you say? How about baked beans and then bake them a little further. What about a stuffed 'pepper' substituting the pepper with the onion? Or, better yet a squash casserole.
We stuffed ours with a White Wine Risotto w/Asparagus tips.
Take a large funnel, use a knife or small saw and open up the end of the funnel about an inch. Now use that and a dowel (or handle of round wooden spoon) to push thru your filling...Look at the next picture to get an idea of that:

Sorry the pictures aren't the greatest, but 'folks' is busy cookin' U know?!
Just in case you forget!
RULES OF THE CHEF
* The Chef is always right.
* The Chef does not sleep, he rests.
* The Chef does not eat, he nourishes himself.
* The Chef does not drink, he tastes.
* The Chef is never late, he is delayed.
* The Chef never leaves the service, he is called away.
* If you enter the Chef’s office with your own ideas, you leave with his.
* The Chef is always the Chef, even in his pajamas.
* If you criticize the Chef, you criticize the Almighty.
* Chef is always spelled with a capital C.
Got it? Good, now carry on.
Fresh Bread


Cheap Canned Biscuit Desserts
 Now you don't have to use this brand, actually you probably have a comparable generic brand at your favorite grocery store...but these are the type canned biscuits I am using, jumbo flaky. But regular will do as well.
After opening the biscuits just smoosh one flat and fill it with a chunk of chocolate, some kind of jam, marshmallows w/graham crackers and chocolate, junks of your favorite candy bar, etc. I think you get the picture, then fold over filling and use a fork the crimp the ends down making the pregnant folded over biscuit look like a small empanada.
 chunk of chocolate, some kind of jam, marshmallows w/graham crackers and chocolate, junks of your favorite candy bar, etc. I think you get the picture, then fold over filling and use a fork the crimp the ends down making the pregnant folded over biscuit look like a small empanada.
Bake at 350F till it looks golden brown and I am pretty sure the 'filling' will be good and melted/heated. YUM! Let it cool down a little...or follow the package instructions for the biscuits.
 Yeah baby! MMmm, but lets think about savory for awhile...how about a few peperoni's, mozzarella cheese, lil' oregano...now that would be delicious too!
This concludes your cheap canned biscuit dessert. Until next time...think about donuts.
New Version
Supposedly I am on a 'new version' of my same blogger...new and improved. Ha, we'll see. I wonder if you readers will notice at all?
Exclusively Yours Catering is getting a slow start in January, but that's to be expected...everyone is partied out from Christmas and New Years! On the other hand we have events scheduled as far out as June, with a bid in for a 2 day event in April for an Engineers Conference of sorts.
In March we will once again probably cater the food for the Tyler AIDS 'Matisse March Madness' fund raiser. We have done several things with Tyler AIDS Service (for free of course) we get food donations from our purveyors and then volunteer our time. Last October we did 'Dancing With The Tyler Stars' to help Tyler AIDS Service to raise funds. If you are wondering where are credits are on these links..we fall under the category: sponsored by local area chefs. But I guess that keeps us humble.
Mercy Ships is 'cranking up' again. Classes have already started for Introduction to Missions, and next I think its Medical Missions and another Gateway class starting up...so lots of work to be done in the kitchen at the IOC.
On a personal note, Stephanie has been sick off and on with a virus of sorts but as of current she is tired but doing well.
I am experimenting with my own versions of ice blended coffee drinks at home. And getting a fair amount of success in getting them 'Coffee Bean & Tea Leaf or Starbucks' quality taste.
My picture slide show below this post will probably have some new pictures in the rotation coming in a few days.
Ah, time to get started at work....
Subscribe to:
Comments (Atom)